
Table of Contents
This guide describes how to set up a company Wi-Fi network that authenticates via Google Workspace credentials. FreeRADIUS is open source and the industry standard for RADIUS servers.
FreeRADIUS
Features
- Support multiple LDAP domains like
@housemage.nland@housemage.com. - RADIUS assigned VLANs depending on Google Workspace group.
- Cache LDAP authentication to avoid unnecessary LDAP queries, since users can roam between APs a lot.
Requirements
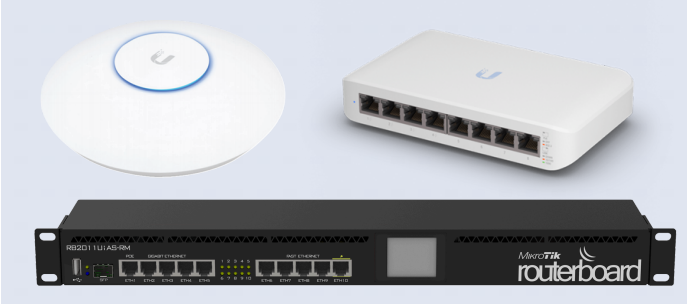
The following hardware was used for the Proof of Concept:
- Linux distro
- Raspberry Pi 3B+ with Debian 12 Bookworm
- UniFi AP
- UniFi U6+ (Supports WPA2/3 and Wi-Fi 4/5/6)
- UniFi Console
- Unifi Cloud Key G2 Plus
- The console can also be installed on a Windows, macOS or Linux device with UniFi Network Server.
Installation
References: https://wiki.freeradius.org/guide/Getting-Started, https://wiki.freeradius.org/building/Home
Package manager
Installing via the package manager is simple, makes updating easier and comes with the daemon to auto start the FreeRADIUS service. Debian Bookworm offers FreeRADIUS v3.2.1.
sudo apt-get install libldap2-dev # for rlm_ldap
sudo apt-get install freeradius
FreeRADIUS configuration files will be located in /etc/freeradius/raddb.
You might have to download the /usr/lib/freeradius/rlm_ldap.so file for the LDAP module.
Compile from source
The advantage to this is we can use the newest version v3.2.3 (or even v4.0.0).
sudo apt-get install build-essential
sudo apt-get install libssl-dev libtalloc-dev # required libs
sudo apt-get install libldap2-dev # for rlm_ldap

wget https://github.com/FreeRADIUS/freeradius-server/releases/download/release_3_2_3/freeradius-server-3.2.3.tar.gz
tar -zxvf freeradius-server-3.2.3.tar.gz
cd freeradius-server-3.2.3/

./configure
make
sudo make install
There are small changes related to LDAP between version 3.2.1 and 3.2.3, see the changelog:
- https://github.com/FreeRADIUS/freeradius-server/releases/tag/release_3_2_3
- https://github.com/FreeRADIUS/freeradius-server/releases/tag/release_3_2_2
FreeRADIUS configuration files will be located in /usr/local/etc/raddb and root access is required. The guide will use this path since I compiled from source.
Configuration
The full example configuration files are located in
UniFi RADIUS profile
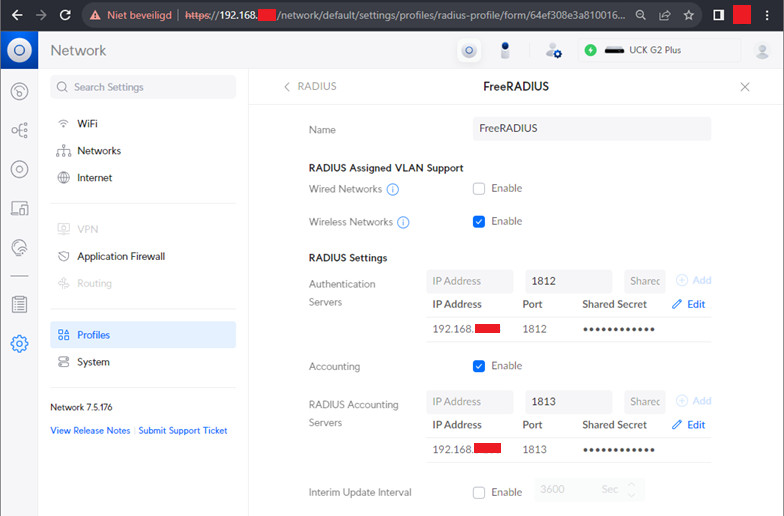
Create a new RADIUS profile in the UniFi console:
Settings -> Profiles -> RADIUS
- Set the IP Address of the RADIUS server and define a shared secret for the authentication server.
Note: The “Default” profile cannot be used as it’s intended for using a UniFi gateway.
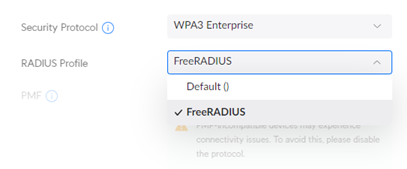
Create a WiFi network:
Settings -> WiFi
- Choose WPA2 (or WPA3) Enterprise and select our RADIUS Profile.
RADIUS Clients
Reference: https://wiki.freeradius.org/guide/Getting-Started#adding-a-client
Add the IP of the RADIUS clients (e.g. Access Points) and the shared secret.
# raddb/clients.conf
client localhost {           # can be any name you want
    ipaddr = 192.168.17.0/24  # can be a single IP or a network range
    secret = blueMage17
}
Note: quotes are optional in configuration files, e.g. all of these are valid:
	ipaddr = 192.168.17.0/24
	ipaddr = '192.168.17.0/24'
	ipaddr = "192.168.17.0/24"
Adding custom users
Reference: https://wiki.freeradius.org/guide/Getting-Started#initial-tests
If you want to test users with plain text passwords you can add them to the top of this file. This will work alongside LDAP authentication.
# raddb/users (symlinked to raddb/mods-config/files/authorize)
Ketho     Cleartext-Password := "banana17"
    Reply-Message := "Hello, %{User-Name}"
# when encrypting a password with radcrypt
KethoTest Crypt-Password := "getnAW/RWGlKw" # foobar
For custom users to work, make sure the files module is included in the default virtual server. It’s not recommended to combine custom users with LDAP groups in the files module, as it would spam multiple LDAP requests even before the TLS handshake is complete.
authorize {
    filter_username
    preprocess
    suffix
    files
    eap {
        ok = return
    }
}
Realm proxy
Reference: https://wiki.freeradius.org/config/Proxy
When a user logs in with ketho@housemage.nl (instead of only ketho), then the rlm_realm module looks up the realm (housemage.nl). So we need to define the realms in proxy.conf. The rest of the file is unused and can be deleted.
# raddb/proxy.conf
realm housemage.nl {}
realm housemage.com {}
Testing the FreeRADIUS server
At this point you should have a functional FreeRADIUS server (with default config), which allows wi-fi authentication via the UniFi APs.
sudo radiusd     # starts the daemon
sudo radiusd -X  # for showing debug prints
sudo radiusd -X &> log/20230926.txt # log output and stderr to file
To stop the daemon, if applicable.
systemctl stop freeradius
To kill any background radiusd process.
sudo pkill radiusd
You can test locally with radtest.
radtest <user> <password> 127.0.0.1 0 <secret>
radtest bob hello 127.0.0.1 0 testing123
Now try to login to your WPA2-Enterprise wi-fi with a test user from raddb/users with PEAP:MSCHAPv2, without validating certificates.
Certificates
Reference: https://networkradius.com/articles/2021/10/25/EAP-production-certificates.html, https://github.com/FreeRADIUS/freeradius-server/blob/v3.2.x/raddb/certs/README.md
FreeRADIUS can generate self-signed certificates from these configuration files:
ca.cnf- Root Certification Authority certificateserver.cnf- Server certificate. This certificate will be what users see when connecting to the network for the first time.client.cnf- Client certificates (optional for TTLS)
The configuration files should have your company information, this must match between all files (including client.cnf) or the makefile will throw an error that they don’t match up. For example:
# raddb/certs/ca.cnf
[certificate_authority]
countryName         = NL
stateOrProvinceName = Zuid-Holland
localityName        = Rotterdam
organizationName    = HouseMage
emailAddress        = ketho@housemage.nl
commonName          = "HouseMage CA Certificate"
# raddb/certs/server.cnf
[server]
countryName         = NL
stateOrProvinceName = Zuid-Holland
localityName        = Rotterdam
organizationName    = HouseMage
emailAddress        = ketho@housemage.nl
commonName          = "HouseMage Server Certificate"
The output_password field in server.cnf should match private_key_password in mods-enabled/eap, so that the server can decrypt the server.pem private key file.
Note: This password is also used to protect the .p12 private key files, fwiw.
# raddb/certs/server.cnf
[ req ]
output_password     = ripeBanana17
# raddb/mods-enabled/eap
eap {
    tls-config tls-common {
        private_key_password = ripeBanana17
        private_key_file = ${certdir}/server.pem
        certificate_file = ${certdir}/server.pem
        ca_file = ${certdir}/ca.pem
    }
}
# raddb/certs/client.cnf
[client]
countryName         = NL
stateOrProvinceName = Zuid-Holland
localityName        = Rotterdam
organizationName    = HouseMage
emailAddress        = ketho@housemage.nl
commonName          = "User Certificate Ketho"
Also set the default_days expiration time to something longer than the default of 60 days.
Once the configuration files are edited, delete any test certificates and generate the new certificates. This can take around 5-7 minutes.
/raddb/certs/
cd /usr/local/etc/raddb/certs/

# purge certificates
make destroycerts
#> rm -f *~ dh *.csr *.crt *.p12 *.der *.pem *.key index.txt* serial*  *\.0 *\.1 ca-crl.pem ca.crl

# generate new certificates
make
Log passwords with authentication requests
Reference: https://wiki.freeradius.org/config/Logging#log-passwords
It is possible to log the plain text passwords while debugging and to file but the option is disabled by default.
Note that when we have an inner-tunnel then passwords will be printed in debug mode anyway since it needs to proxy it to Secure LDAP.
# /usr/local/etc/raddb/radiusd.conf
log {
    auth = yes
    auth_goodpass = yes
}
# /usr/local/var/log/radius/radius.log
Thu Sep 28 15:24:00 2023 : Auth: (7)   Login OK: [ketho/miku1234] (from client <snip> port 0 via TLS tunnel)
Thu Sep 28 15:24:00 2023 : Auth: (7) Login OK: [ketho/<via Auth-Type = eap>] (from client <snip> port 0 cli 5A-B9-35-<snip>)
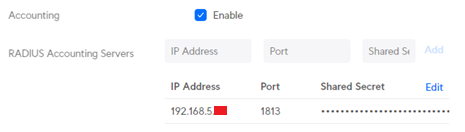
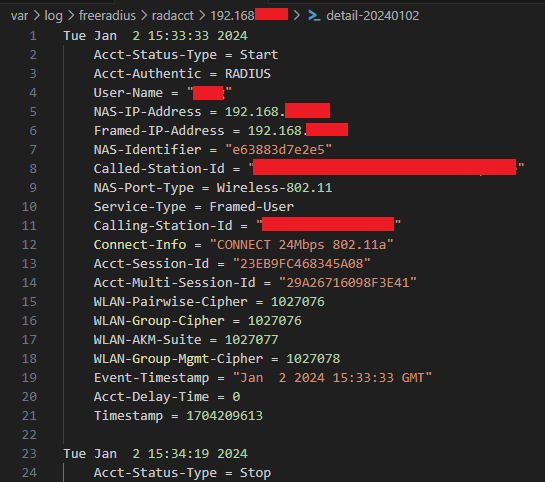
Accounting
Accounting is optional and also needs to be enabled in UniFi.
RADIUS authentication attempts will be logged to var/log/freeradius/radacct.
raddb/sites-enabled/default
accounting {
    detail
    attr_filter.accounting_response
}
rlm_ldap
Reference: https://wiki.freeradius.org/modules/rlm_ldap, https://support.google.com/a/topic/9048334
With rlm_ldap we can authenticate via Secure LDAP to Google Workspace (rlm stands for RADIUS Loadable Module).
LDAP Certificate
- Generate a certificate and private key, for example
housemage.crtandhousemage.key. - Create the folder and move them to
/usr/local/etc/raddb/certs/google(requires root).
raddb/mods-available/ldap
Reference: https://support.google.com/a/answer/9089736#zippy=%2Cfreeradius
FreeRADIUS modules are enabled by moving or symlinking them from mods-available to mods-enabled
cd /usr/local/etc/raddb/mods-enabled/
ln -s ../mods-available/ldap ldap
We have the default ldap domain and the ldap_housemage_com domain. We need to have at least a default domain for group search queries.
ldap {
	server   = 'ldaps://ldap.google.com:636'
	identity = '<snip>'
	password = '<snip>'
	base_dn  = 'dc=housemage,dc=nl'
	user {
		base_dn = "ou=Users,${..base_dn}"
		filter  = "(uid=`%{`%{Stripped-User-Name}:-`%{User-Name}})"
	}
	group {
		base_dn = "ou=Groups,${..base_dn}"
		filter = '(objectClass=posixGroup)'
		membership_attribute = 'memberOf'
	}
	options {
		res_timeout = 10   # Seconds to wait for LDAP query to finish. default: 20
		srv_timelimit = 3  # Seconds LDAP server has to process the query (server-side time limit). default: 20
		net_timeout = 1    # Seconds to wait for response of the server. (network failures) default: 10
		interval = 3       # LDAP_OPT_X_KEEPALIVE_INTERVAL default 30
	}
	tls {
		certificate_file = ${certdir}/google/housemage.crt
		private_key_file = ${certdir}/google/housemage.key
		require_cert     = 'allow'
		tls_min_version  = "1.2"      # default: 1.2
		cipher_list      = "DEFAULT"  # default: DEFAULT
	}
}

ldap ldap_housemage_com {
	server   = 'ldaps://ldap.google.com:636'
	identity = '<snip>'
	password = '<snip>'
	base_dn  = 'dc=housemage,dc=com'
	user {
		base_dn = "ou=Users,${..base_dn}"
		filter  = "(uid=`%{`%{Stripped-User-Name}:-`%{User-Name}})"
	}
	group {
		base_dn = "ou=Groups,${..base_dn}"
		filter = '(objectClass=posixGroup)'
		membership_attribute = 'memberOf'
	}
	options {
		res_timeout = 10
		srv_timelimit = 3
		net_timeout = 1
		interval = 3
	}
	tls {
		certificate_file = ${certdir}/google/housemage.crt
		private_key_file = ${certdir}/google/housemage.key
		require_cert     = 'allow'
		tls_min_version  = "1.2"
		cipher_list      = "DEFAULT"
	}
}
raddb/sites-enabled/default
FreeRADIUS supports multiple virtual servers which are RADIUS servers with separate policies. But we will only use a default and google-ldap virtual server.
server default {

	listen {
		type = auth
		ipaddr = *
		port = 0
		limit {
			max_connections = 16
			lifetime = 0
			idle_timeout = 30
		}
	}

	listen {
		ipaddr = *
		port = 0
		type = acct
		limit {}
	}

	authorize {
		filter_username
		preprocess
		suffix  # formatting for user and realm name
		eap {
			ok = return
		}
	}

	authenticate {
		eap     # TLS handshake
	}

	accounting {
		detail
		attr_filter.accounting_response
	}

	post-auth {
		# for EAP-TTLS and PEAP, add the cached attributes to the reply
		# required for caching VLANs
		if (session-state:User-Name && reply:User-Name && request:User-Name && (reply:User-Name == request:User-Name)) {
			update reply {
				&User-Name !* ANY
			}
		}
		update {
			&reply: += &session-state:
		}
	}
}
raddb/sites-enabled/google-ldap
The google-ldap virtual server is mentioned in the eap->ttls module.
LDAP caching is configured; the default TTL is 2 hours as defined in the cache_auth module.
server google-ldap {

	listen {
		   ipaddr = 127.0.0.1
		   port = 18120
		   type = auth
	}

	authorize {
		# sanitize user and realm for google ldap
		filter_username
		filter_inner_identity
		split_username_nai

		# check ldap cache
		update control {
			&Cache-Status-Only := 'yes'
		}
		cache_auth_accept

		if (ok) {
			update {
				&control:Auth-Type := Accept
			}
			return
		}

		update control {
			&Cache-Status-Only := 'yes'
		}
		cache_auth_reject

		if (ok) {
			update {
				&Module-Failure-Message := "Rejected by cache entry"
			}
			reject
		}
		# support EAP auth for TTLS-GTC, macOS, iOS
		eap {
			ok = return
		}
		# check google workspace groups
		files
		if (User-Password && !control:Auth-Type) {
			update control {
				Auth-Type := LDAP
			}

			update control {
				&Cache-Read-Only := "yes"
			}
			cache_ldap_user_dn
		}
	}

	authenticate {
		# TTLS-GTC, macOS, iOS
		eap
		# TTLS-PAP, Windows
		Auth-Type LDAP {
			%{realm}
			switch &realm {
				case "housemage.nl" {
					ldap
				}
				case "housemage.com" {
					ldap_housemage_com
				}
				case {
					ldap {
						ok = return
					}
					ldap_housemage_com
				}
			}
		}
	}

	post-auth {
		# trim unneeded stuff for the tunneled reply
		if (1) {
			update reply {
				User-Name !* ANY
				Message-Authenticator !* ANY
				EAP-Message !* ANY
				Proxy-State !* ANY
				MS-MPPE-Encryption-Types !* ANY
				MS-MPPE-Encryption-Policy !* ANY
				MS-MPPE-Send-Key !* ANY
				MS-MPPE-Recv-Key !* ANY
			}

			update {
				&outer.session-state: += &reply:
			}
		}

		# update ldap cache
		cache_ldap_user_dn

		if (&control:Auth-Type == ldap) {
			cache_auth_accept
		}

		Post-Auth-Type REJECT {
			attr_filter.access_reject

			if (&control:Auth-Type == ldap) {
				cache_auth_reject
			}

			update control {
				&Cache-TTL := 0
			}
			cache_ldap_user_dn

		}
	}
}
Note: Enabled sites in sites-enabled are symlinked to sites-available, similar to mods-enabled and mods-available.
raddb/mods-enabled/eap
eap {
	default_eap_type = ttls
	timer_expire = 60
	ignore_unknown_eap_types = no
	max_sessions = ${max_requests}

	gtc {
		auth_type = LDAP
	}

	tls-config tls-common {
		private_key_password = <snip>  # this is the certs/server.cnf output_password
		private_key_file = ${certdir}/server.pem
		certificate_file = ${certdir}/server.pem
		ca_file = ${certdir}/ca.pem
		ca_path = ${cadir}
		cipher_list = "DEFAULT"
		cipher_server_preference = no
		tls_min_version = "1.2"
	}

	ttls {
		tls = tls-common
		default_eap_type = gtc    # required for TTLS-GTC, macOS, iOS; default md5
		use_tunneled_reply = yes  # required for RADIUS assigned VLANS; deprecated, defaults to 0
		virtual_server = "google-ldap"
	}
}
Testing
- The user can be the user id or the email address, for example
kethoorketho@housemage.nl - With iOS and Windows logging in should not require any extra steps.
- On Android this requires setting the following:
- EAP-TTLS
- CA-certificate: Don’t validate
- Verification phase 2: PAP (default) or GTC
- Anonymous identity: this is an optional field. other devices on the network will only be able to see this identity instead of the user id as a privacy measure.

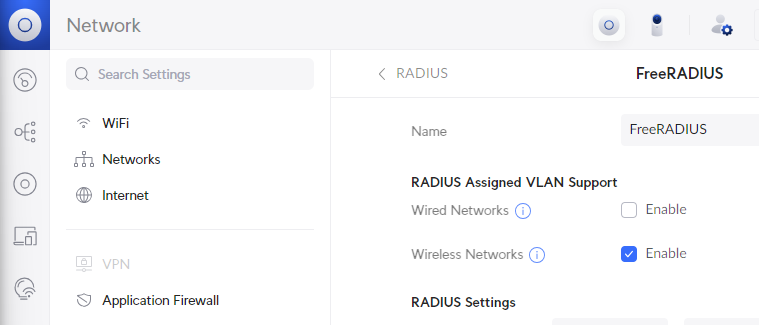
RADIUS assigned VLANs
Reference: https://techblog.glendaleacademy.org/freeradius/dynamic-vlans-and-g-suite#h.p_llOzjTYCycDS
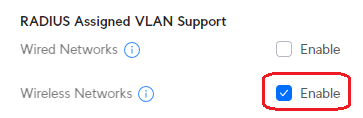
- Enable
RADIUS Assigned VLAN Support -> Wireless Networks
The configuration rules are in sequential order. For example if ketho is eligible for both the first and second rule, it will match the first one and be assigned to VLAN 10.
DEFAULT Ldap-Group == "cn=office1,ou=Groups,dc=housemage,dc=nl"
        Tunnel-Type = VLAN,
        Tunnel-Medium-Type = IEEE-802,
        Tunnel-Private-Group-Id = 10

DEFAULT Ldap-Group == "cn=office2,ou=Groups,dc=housemage,dc=nl"
        Tunnel-Type = VLAN,
        Tunnel-Medium-Type = IEEE-802,
        Tunnel-Private-Group-Id = 20

# default VLAN
DEFAULT
        Tunnel-Type = VLAN,
        Tunnel-Medium-Type = IEEE-802,
        Tunnel-Private-Group-Id = 30
RouterOS VLANs
Reference: https://help.ui.com/hc/en-us/articles/9761080275607-UniFi-Network-Creating-Virtual-Networks-VLANs
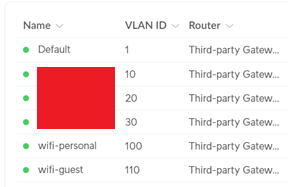
VLANs are virtual networks. For example we can have the following VLANs:
- 10 - office1
- 20 - office2
- 30 - office3
- 100 - wifi_personal
- 110 - wifi_guest
To implement them we need to:
- Define the VLANs in the UniFi console.
- Define the VLANs in the router (in my case Mikrotik) and Configure InterVLAN routing.
- For users connecting via ethernet - assign your switchports access ports to a specific VLAN.
We already can assign VLANs through RADIUS, so the only thing we still require is InterVLAN routing.
RADIUS assigned VLANs
In Google Workspace we can create groups, and in FreeRADIUS we can assign a VLAN to them.
raddb/users
DEFAULT Ldap-Group == "cn=office1,ou=Groups,dc=housemage,dc=nl"
        Tunnel-Type = VLAN,
        Tunnel-Medium-Type = IEEE-802,
        Tunnel-Private-Group-Id = 10

DEFAULT Ldap-Group == "cn=office2,ou=Groups,dc=housemage,dc=nl"
        Tunnel-Type = VLAN,
        Tunnel-Medium-Type = IEEE-802,
        Tunnel-Private-Group-Id = 20

DEFAULT Ldap-Group == "cn=office3,ou=Groups,dc=housemage,dc=nl"
        Tunnel-Type = VLAN,
        Tunnel-Medium-Type = IEEE-802,
        Tunnel-Private-Group-Id = 30
Configure MikroTik router
Reference: https://wiki.mikrotik.com/wiki/Manual:First_time_startup, https://wiki.mikrotik.com/wiki/Manual:Initial_Configuration
To start with a clean slate, we can reset the whole thing to an empty configuration instead of factory defaults.
/system reset-configuration no-defaults=yes skip-backup=yes
Note this is for setting up a MikroTik router behind another router, with NAT instead of routing.
# user
/user
    add name=ketho password="<snip>" group=full
    remove admin
# bridge
/interface bridge
    add name=hw_bridge
/ip address
    add address=192.168.2.1/23 interface=hw_bridge
# dhcp
/ip pool
    add name=default_pool ranges=192.168.2.50-192.168.2.254
/ip dhcp-server
    add address-pool=default_pool interface=hw_bridge lease-time=10m name=dhcp1
/ip dhcp-server network
    # there is a dnsmasq server but use this router anyway
    add address=192.168.2.0/24 dns-server=192.168.2.1 gateway=192.168.2.1
# this router is a dhcp client of the RB5009
/ip dhcp-client
    add interface=ether1
# dns
/ip dns
    # this router is the dns server
    set allow-remote-requests=yes
# nat
/ip firewall nat
    add action=masquerade chain=srcnat out-interface=ether1
# serial console
/system console
    disable 0
/port
    set serial0 baud-rate=115200 data-bits=8 parity=none stop-bits=1
/system console
    enable 0
# this will disconnect the terminal if we're connected via one of the interfaces
/interface bridge port
    add bridge=hw_bridge interface=ether2
    add bridge=hw_bridge interface=ether3
    add bridge=hw_bridge interface=ether4
    add bridge=hw_bridge interface=ether5
Configure VLANs
Now we need to define the VLANs and assign their DHCP pools. InterVLAN routing should work once they are created.
# vlans
/interface vlan
    add interface=hw_bridge vlan-id=10  name=office1
    add interface=hw_bridge vlan-id=20  name=office2
    add interface=hw_bridge vlan-id=30  name=office3
    add interface=hw_bridge vlan-id=100 name=wifi_personal
    add interface=hw_bridge vlan-id=110 name=wifi_guest
/ip address
    add address=192.168.10.1/24  network=192.168.10.0  interface=office1
    add address=192.168.20.1/24  network=192.168.20.0  interface=office2
    add address=192.168.30.1/24  network=192.168.30.0  interface=office3
    add address=192.168.100.1/24 network=192.168.100.0 interface=wifi_personal
    add address=192.168.110.1/24 network=192.168.110.0 interface=wifi_guest
/ip pool
    add name=pool_10  ranges=192.168.10.10-192.168.10.254
    add name=pool_20  ranges=192.168.20.10-192.168.20.254
    add name=pool_30  ranges=192.168.30.10-192.168.30.254
    add name=pool_100 ranges=192.168.100.10-192.168.100.254
    add name=pool_110 ranges=192.168.110.10-192.168.110.254
/ip dhcp-server
    add address-pool=pool_10  name=dhcp_10  interface=office1
    add address-pool=pool_20  name=dhcp_20  interface=office2
    add address-pool=pool_30  name=dhcp_30  interface=office3
    add address-pool=pool_100 name=dhcp_100 interface=wifi_personal
    add address-pool=pool_110 name=dhcp_110 interface=wifi_guest
/ip dhcp-server network
    add address=192.168.10.0/24  gateway=192.168.10.1  dns-server=192.168.10.1
    add address=192.168.20.0/24  gateway=192.168.20.1  dns-server=192.168.20.1
    add address=192.168.30.0/24  gateway=192.168.30.1  dns-server=192.168.30.1
    add address=192.168.100.0/24 gateway=192.168.100.1 dns-server=192.168.100.1
    add address=192.168.110.0/24 gateway=192.168.110.1 dns-server=192.168.110.1